![all bottles brighter]()
.
Knowing which blood bottles to use for different tests may not be that important for passing your finals, but will be absolutely essential when you start work on the wards afterwards. It is one of those practical things which tends to be poorly taught at medical school, if at all. Instead you are seemingly expected to just pick it up on your first day as an F1, when taking bloods correctly will suddenly become a massive cornerstone of your workload. Even though most hospitals now have printable stickers for bottles which tell you which ones to use, it is still vital to have a basic understanding of which bottles are used and why, to prevent embarassing mistakes and/or awkward phone calls from the lab.
.
The colours of the Vacutainer bottles are standardised, but depending which hospital you end up working in there may be some variation in preferences between individual laboratories, especially when it comes to tests which are performed less commonly. I have used as many sources as possible to compile the information below, so hopefully it is as accurate as possible, but obviously I cannot guarantee it will be applicable to all hospitals. Always check local guidelines if you’re not sure.
.
For more information on how to perform venesection, see here for the Geeky Medics OSCE guide.
.
.
THE PURPLE ONE (aka “Lavender”)
![purple brighter]()
.
These bottles are generally used for haematology tests where whole blood is required for analysis.
.
ADDITIVE: contains EDTA (ethylenediaminetetraacetic acid), which acts as a potent anticoagulant by binding to calcium in the blood. EDTA also binds metal ions in the blood and is used in chelation therapy to treat iron, lead or mercury poisoning. Its blood-binding capacity also means it can be labelled with radioisotopes and used as an EDTA scan to test renal glomerular filtration rate.
.
COMMON TESTS:
- full blood count (FBC)
- erythrocyte sedimentation rate (ESR)
- blood film for abnormal cells or malaria parasites
- reticulocytes
- red cell folate
- Monospot test for EBV
- HbA1C for diabetic control
- parathyroid hormone (PTH)*
- less commonly used for: ciclosporin/tacrolimus levels, some viral PCR tests, G6PD, ACTH level*, porphyria screen*, plasma metanephrines*, fasting gut hormone screen*
.
TIPS FOR USE: the purple tube needs inverting about 8 times to mix the sample with the EDTA. About 1ml of blood is sufficient to do a full blood count, but to get an ESR you need a full purple bottle.
.
THE PINK ONE
![pink brighter]()
.
The pink bottles work in the same way as the purple ones, but are specifically used only for whole blood samples being sent to the transfusion lab.
.
ADDITIVE: this tube also contains the anticoagulant EDTA.
.
COMMON TESTS:
- group and save (G&S) - this simply means the patient’s blood is typed and tested for antibodies, then saved in the lab in case it is required; it DOES NOT get you blood products for transfusion. If you need blood products you have to request a crossmatch.
- crossmatch (XM) – this means that the patient’s blood is typed and tested as above, then matched to specific units of blood, platelets or other products for transfusion. You need to specify on the form how many units you need, why you need them and when they are required. A full crossmatch takes about 45-60 minutes in the lab – if you have an unstable bleeding patient and think you’ll need blood products sooner than this, you still need to send a crossmatch sample, but you can ask the lab for units of type-specific blood (which take 10-20 minutes), or in a genuine emergency you can use their stocks of O negative blood from the fridge.
- direct Coomb’s test (aka direct antiglobulin test) for autoimmune haemolytic anaemia
- less commonly used for: testing for specific red cell antibodies (3 bottles required), can be used for other haematology tests such as FBC if the ward runs out of purple bottles.
.
TIPS FOR USE: the pink tube needs inverting about 8 times to mix the sample with the EDTA. It should contain at least 1ml of blood, but more is preferred by the labs if at all possible. It has a special label which needs to be carefully filled in by hand at the bedside to ensure the correct patient details are used and prevent potentially catastrophic mismatched blood transfusions. If you need blood for a patient urgently, or have any unusual or complicated requests, you must ring the transfusion lab and let them know, or you risk invoking their terrifying wrath.
.
For more detail on safe blood transfusion, see here for the Geeky Medics OSCE guide.
.
.
THE BLUE ONE
![blue]()
.
The blue bottle is used for haematology tests involving the clotting system, which require inactivated whole blood for analysis.
.
ADDITIVE: contains buffered sodium citrate, which acts as a reversible anticoagulant by binding to calcium ions in the blood and subsequently disrupting the clotting cascade. Sodium citrate is also added to blood products for transfusion, and acts as a preservative by stopping them from clotting in the bag.
.
COMMON TESTS:
- coagulation screen including bleeding time for platelet function, prothrombin time (PT) for extrinsic pathway, activated partial thromboplastin time (APTT) for intrinsic pathway, and thrombin time (TT) or fibrinogen assay for the final common pathway
- D-dimer for thrombosis e.g. due to DVT or PE
- INR for monitoring patients on warfarin (this is calculated from the prothrombin time)
- activated partial thromboplastin ratio (APTR) for monitoring patients on IV heparin infusions (this is calculated from the APTT)
- anti-Xa assay for monitoring patients on high-dose low molecular weight heparins like tinzaparin
- less commonly used for: specific clotting factors e.g. factor VIII, factor IX, von Willebrand factor, thrombophilia screen, lupus anticoagulant
.
TIPS FOR USE: the blue bottle needs to be inverted 3-4 times to mix the sample with the anticoagulant. The sodium citrate liquid in the bottle dilutes the blood sample, and the machines in the lab are specifically calibrated to interpret results based on a set ratio of blood to anticoagulant. It is therefore essential that the bottle is filled to the line marked around its edge to ensure the tests are interpreted accurately – otherwise the samples may be over-anticoagulated. Some clotting tests need to be taken at specific times; INRs should ideally be done in the morning, and anti-Xa assays must be taken 3-4 hours after tinzaparin is given. APTR timings are often indicated on the prescription algorithm.
.
.
THE YELLOW ONE (aka “Gold”)
![yellow brighter]()
.
These bottles are used for a huge variety of tests requiring separated serum for analysis, including biochemistry, endocrinology, oncology, toxicology, microbiology and immunology.
.
ADDITIVE: this tube is known in the lab as the SST (serum separating tube). It contains two agents; silica particles and a serum separating gel. The silica particles work to activate clotting and cause the blood cells to clump together. The serum separator consists of an inert polymer gel which floats as a layer between the blood cells and plasma to form a physical barrier between them. This means that the sample can be centrifuged (spun) in the lab and the separated serum easily removed.
.
COMMON TESTS:
- biochemistry tests are the ones you will encounter most commonly:
- urea and electrolytes (U+E) – this includes urea, creatinine, sodium and potassium
- C-reactive protein (CRP)
- liver function tests (LFTs) – this includes bilirubin, ALP, AST/ALT, GGT, total protein and albumin
- amylase assay
- bone profile - this includes calcium, phosphate, ALP and albumin
- magnesium assay
- iron studies - this includes serum iron, ferritin, transferrin saturation and total iron binding capacity
- lipid profile – this includes cholesterol, LDL, HDL and triglycerides
- thyroid function tests (TFTs) – this includes TSH, free T4 +/- free T3
- vitamins e.g. vitamin B12
- troponins – this requires 2 samples to be taken at different times to assess the acute trend
- creatine kinase (CK)
- urate
- serum osmolality – this requires a urine sample to be taken at the same time
- endocrinology: beta-hCG, calcitonin*, cortisol, EPO, sex hormones, growth hormone, IGF-1
- tumour markers: PSA, CEA, CA-125, CA19-9, AFP, lactate dehydrogenase (LDH)
- toxicology: ethanol, cannabis, opiates, benzodiazepines, other drugs e.g. cocaine, amphetamines
- drug levels: paracetamol, salicylates (aspirin), digoxin, lithium, gentamicin, carbamazepine
- microbiology/virology: serology for a wide variety of bacterial, viral, fungal and parasitic infections including HIV and viral hepatitis
- immunology: immunoglobulins, complement, autoantibody screen, rheumatoid factor, thyroid antibodies, α1AT, ACE
.
TIPS FOR USE: the yellow bottle needs to be inverted about 5 times to mix the sample with the silica and separator. Don’t panic if the blood starts to clot or separate in the bottle, it’s supposed to! The amount of blood required will depend on how many tests you’re doing, but at least 1ml is ideal. You can usually get about 12 tests from one full yellow bottle. Remember that different labs may be located in different areas and technicians don’t like sharing – this means you’ll need to put your biochemistry and microbiology samples in separate yellow bottles to go to their respective laboratories.
.
.
THE GREY ONE
![grey brighter]()
.
The grey bottle is only used for two tests, so compared to the yellow one it’s fairly easy to remember! It is used for biochemistry tests requiring whole blood for analysis.
.
ADDITIVE: contains two main agents. Sodium fluoride acts as an antiglycolytic agent to ensure that no further glucose breakdown occurs within the sample after it is taken. Potassium oxalate acts as an anticoagulant. Some variants of the grey bottle use EDTA as the anticoagulant instead.
.
COMMON TESTS:
- glucose - this can be fasting or non-fasting, or part of a glucose tolerance test (GTT)
- lactate
- less commonly used for: blood ethanol if not for legal purposes
.
TIPS FOR USE: the grey bottle needs to be inverted about 8 times to mix the sample with the fluoride and oxalate. Only a tiny amount of blood is required for a glucose, but for a lactate the bottle should ideally contain at least 1ml of blood. Venous glucose results are generally more accurate than fingerprick BM tests, especially in hyperglycaemic patients, but can take a while to come back from the lab. If you need a blood glucose urgently then ask one of the nurses to do a BM for you on the ward. Samples for venous lactate need to be sent to the lab immediately. Again, the results tend to take a while to come back, so if you’re desparate for a lactate see if you can get access to an ABG machine that does arterial lactates – these are often available in A+E or ITU, and take about 2 minutes to process.
.
.
THE RED ONE
![red brighter]()
.
The red bottle is less common – it is used for biochemistry tests requiring serum which might be adversely affected by the separator gel used in the yellow bottle.
.
ADDITIVE: contains silica particles which act as clot activators.
.
COMMON TESTS:
- the use of this bottle varies greatly - some hospitals use it for many sensitive tests, including hormones, toxicology, drug levels, bacterial and viral serology and antibodies, whereas others seem to only use it for a few very specific purposes and use the yellow bottle for most things.
- my hospital definitely uses it for ionised calcium, but not much else
- less commonly used for: fluoride, cryoglobulins, cold agglutinins
.
TIPS FOR USE: the red bottle needs inverting 5 times to mix the sample with the clot activator. There is also another version of the red bottle made out of glass, which contains no additives whatsoever.
.
.
THE DARK GREEN ONE
![dark green brighter]()
.
This less commonly used bottle is for biochemistry tests which require heparinised plasma or whole blood for analysis.
.
ADDITIVE: contains sodium heparin, which acts as an anticoagulant.
.
COMMON TESTS:
- ammonia*
- insulin*
- renin and aldosterone
- less commonly used for: aluminium, gut hormones, amino acids, homocysteine, chromosomal tests
.
TIPS FOR USE: the green bottle needs to be inverted about 8 times to mix the sample with the heparin. This bottle cannot be reliably used to assess sodium levels.
.
.
THE LIGHT GREEN ONE
![light green brighter]()
.
This rare species of bottle is used for biochemistry tests requiring separated heparinised plasma. I have never actually used one but have seen them on the dermatology ward.
.
ADDITIVE: this bottle is known as the plasma separator tube (PST). It contains lithium heparin, which acts as an anticoagulant, and a plasma separator gel similar to that used in the yellow bottle, which acts to separate out the plasma layer.
.
COMMON TESTS: it can be used for routine biochemistry, but most hospitals seem to use the yellow bottle for this. It can also be used for blood ethanol provided the sample is not for legal purposes.
.
TIPS FOR USE: the light green bottle needs inverting about 8 times to mix the sample with the heparin and separator. This bottle cannot be reliably used to assess lithium levels.
.
.
OTHER ONES I HAVE LITERALLY NEVER SEEN
Despite 18 months of adventures on the wards, there are still some blood bottles I have not yet encountered. I can only assume this means they are hardly ever used and therefore not ones you’ll need to know in detail. They include:
- dark blue – used for toxicology and trace elements such as zinc, selenium and copper (however, the ever-versatile yellow bottle can also be used for these)
- tan – used to test for lead
- orange – contains a thrombin-based clot activator which allows stat serum testing
- light yellow – used for HLA phenotyping, tissue typing, DNA analysis and paternity testing
- white - used for molecular diagnostics such as PCR and DNA amplification studies
- black - for paediatric ESR
- clear lid - used as a discard tube, for example when taking bloods from a central line
.
.
BLOOD CULTURES
![blood cultures]()
.
Blood culture bottles contain a culture medium to encourage the growth of any bacteria in the blood sample. There are different bottles available with culture media for aerobic (blue lid) and anaerobic (purple lid) organisms, alongside a variety of others, including one with a black lid for mycobacterial cultures. Until recently, many hospitals required both aerobic and anaerobic culture samples from a patient, whilst others were happy with just aerobic samples. However, there is now a move towards using the purple top (aka “burgundy”) anaerobic bottles as the standard receptacle for all blood cultures, as studies have shown that they are more effective. Check local guidelines if you’re not sure.
.
TIPS FOR USE: blood cultures must be obtained using aseptic non-touch technique (ANTT) to prevent contamination of the samples with the patient’s skin flora or any bugs that might be lurking on your hands. They should also be taken before any antibiotics are started. The blood culture bottle should always be the first one you fill, and ideally needs 8-10ml of blood to ensure a good chance of catching any organisms. In a perfect world, you would also take another culture from a different site to maximise the diagnostic yield. The results take about 5 days to come back, so if your patient is septic you need to ring microbiology and start them on some empirical antibiotic treatment in the mean time.
.
.
ARTERIAL BLOOD GASES (ABGs)
![ABG brighter]()
.
An ABG is a very useful test when you find yourself confronted with a critically unwell patient, as it tells you about their oxygenation, their acid-base balance, and in some cases their potassium and lactate as well, and the results are available within minutes.
.
TIPS FOR USE: ABG syringes contain heparin to prevent the sample from clotting – you need to expel this through the needle before taking your sample. Some fill automatically as the plunger is pushed back by pressure of the blood coming through the needle, whilst others require you to pull on the plunger yourself to fill the syringe. Try to get the self-filling ones – like those shown above – if you can, as they are infinitely better. Compared to taking venous bloods, ABGs are technically more challenging, more risky and much more uncomfortable for the patient. For more detail and tips on how to take an ABG, see here for the Geeky Medics OSCE guide. Once you have obtained your sample it needs to be taken straight to the lab, as it will become denatured and useless within 10 minutes.
.
.
OTHER TIPS FOR EASY BLOOD-TAKING
“Invert” doesn’t mean “shake”. Be gentle with your samples or they’ll haemolyse.
.
Tests above with a star (*) next to them need to be sent to the lab immediately “on ice” – to do this you either need to get a special ice bag directly from the lab, or if your ward has an ice freezer you can make one yourself by filling a normal sample bag with crushed ice. If you’re not sure you’re doing it right, ring the lab and check, because they can make life very difficult by refusing to accept specimens.
.
The bottles can be used for other non-blood fluids too, for example pleural aspirates, ascitic taps and CSF samples obtained by lumbar puncture. The tests each bottle is used for are the same: the purple one is for cell count, the yellow one is for electrolytes, albumin and LDH, the grey one is for glucose, and blood culture bottles can be used for fluid cultures. Don’t forget to specify on your request form what kind of fluid is in the bottle and which part of the patient you got it from.
.
If you are ever unfortunate enough to find yourself having to get bloods from a child, there are special paediatric blood bottles which are much smaller than the adult ones. The colours are pretty much the same. If you get really stuck and can’t find any, you can use adult bottles instead, but always take them to the lab and explain they are from a child so they don’t reject them as inadequate (they usually have special machines for processing tiny kiddie samples but like to keep this a secret).
.ou
If you are unsure about what you need to do for a particular blood test, ask your friendly local lab technician. They are usually more than happy to give you advice as it means they can prevent you making mistakes that create lots of hassle and annoying paperwork. It’s also better for you if you check, as it saves you having to do your bloods all over again if you do it wrong, and saves your patient from the unpleasantness of unnecessary additional stabbings. Similarly, if you have a really urgent test or only got a pathetically miniscule blob of blood from your patient, take it down to the lab and explain things in person. You’ll find everything miraculously gets done ten times quicker, and smaller samples they would normally reject will often be accepted, if you talk to them face-to-face and ask nicely.
.
.
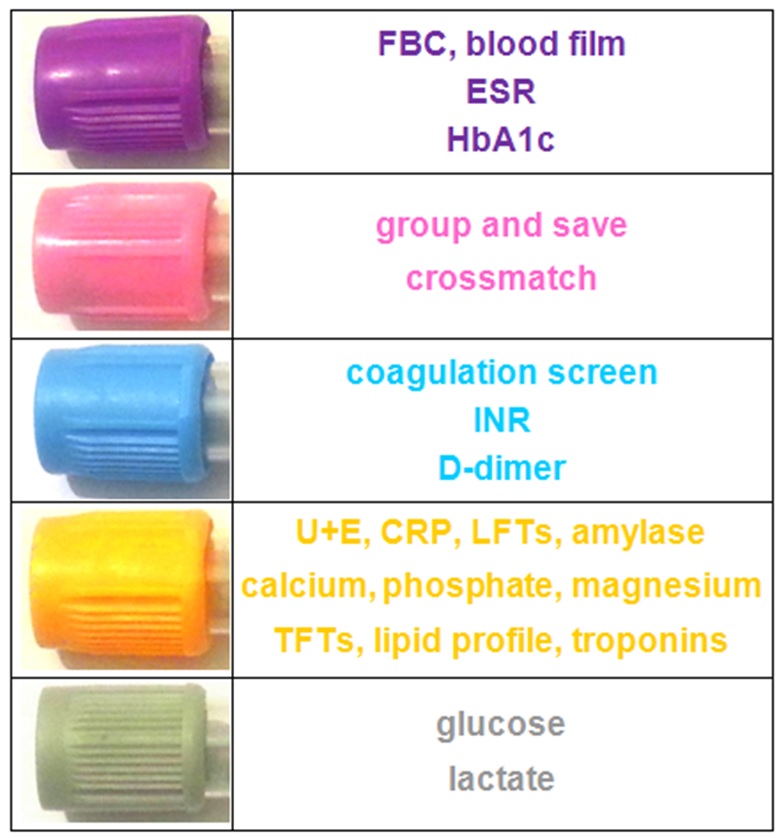
SUMMARY
Here’s a table summarising the bottles you’ll need for common blood tests:
.
![summary]()
.
I hope you found this guide helpful. Good luck!
.
References
- BD Vacutainer Product FAQs, available from http://www.bd.com/vacutainer/faqs/
- BD Vacutainer Venous Blood Collection Tube Guide, available from http://www.bd.com/vacutainer/pdfs/plus_plastic_tubes_wallchart_tubeguide_VS5229.pdf
- another version of the BD Vacutainer Tube Guide including the Order of Draw, available from http://www.kch.nhs.uk/Doc/mi%20-%20059.1%20-%20guide%20to%20blood%20collection%20tubes.pdf
- UCI Pathology Services Manual – Specimen Tube Containers, available from http://www.pathology.uci.edu/PathologyServicesManual/SpecTubesContainers.html
.
Author - Laura Jayne Watson
.
The post Blood Bottles Guide appeared first on Geeky Medics.